
Shark Navigator Lift-Away Instruction Manual: A Comprehensive Guide
Welcome! This manual details assembly, operation, and maintenance of your Shark Navigator Lift-Away vacuum, ensuring optimal cleaning performance and longevity.
Congratulations on selecting the Shark Navigator Lift-Away! This versatile vacuum combines powerful suction with innovative Lift-Away technology, offering unparalleled cleaning convenience. Designed for both carpets and hard floors, it effortlessly transitions between upright and portable modes.
The Lift-Away feature allows cleaning in hard-to-reach areas, above-floor spaces, and even inside vehicles. This manual provides detailed instructions to maximize your vacuum’s potential, ensuring a consistently clean and healthy home environment. Explore its features!
Understanding the Components
Familiarizing yourself with the Shark Navigator Lift-Away’s parts is crucial for effective use and maintenance. Key components include the motorized floor nozzle, detachable canister, wand, hose, dust cup, and various attachments. Each element plays a vital role in delivering powerful cleaning performance.
Understanding how these parts connect and function will streamline your cleaning process and ensure optimal suction. Refer to the following sections for detailed identification and usage instructions for each component.
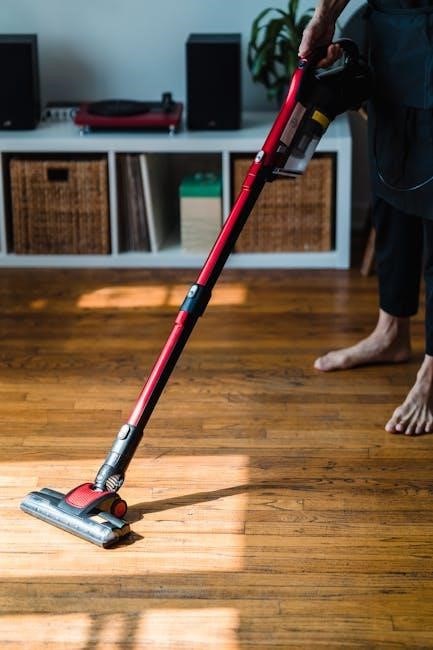
Identifying Key Parts of the Vacuum
The primary components include the powerhead with brushroll, responsible for agitating carpets and floors. The canister houses the dust cup and motor, detaching for portability. The wand and hose extend reach for above-floor cleaning. Note the suction control dial and release buttons.
Locate the filters – both pre-motor and post-motor – essential for trapping dust and allergens. Familiarize yourself with these parts for efficient assembly, operation, and maintenance procedures.
Accessory Overview

Your Shark Navigator often includes a crevice tool for tight spaces, an upholstery brush for furniture, and a dusting brush for delicate surfaces. Some models feature a pet power brush, ideal for removing embedded pet hair from upholstery and carpets.
These attachments connect to the wand or hose, expanding cleaning versatility. Understanding each accessory’s purpose maximizes cleaning effectiveness throughout your home, ensuring a thorough and convenient experience.
Setting Up Your Shark Navigator Lift-Away
Initial setup is simple! First, ensure all components are present. Attach the wand securely to the vacuum body, aligning the connection points until they click. Next, connect the hose to either the wand or the vacuum directly, depending on your cleaning needs.
Proper assembly guarantees optimal suction and functionality, preparing your Shark for effective cleaning across various surfaces.
Initial Assembly Instructions
Begin by unpacking all components carefully. Connect the floor nozzle to the vacuum body, ensuring a snug fit. Then, attach the handle to the top of the vacuum, securing it with the provided locking mechanism. Verify all connections are firm before proceeding.
These initial steps are crucial for a stable and efficient cleaning experience with your Shark Navigator Lift-Away.
Attaching the Wand and Hose
To connect the wand, locate the designated port on the vacuum body or canister. Firmly insert the wand until it clicks into place, ensuring a secure connection for optimal suction. Next, attach the hose to either the wand or directly to the vacuum, depending on your cleaning needs.
Proper attachment maximizes versatility.
Operating Instructions: Upright Mode
For standard floor cleaning, utilize the upright mode. Ensure the brushroll is appropriately set for your floor type – hard floors or carpets. Press the power button to initiate vacuuming. Adjust the suction control to optimize cleaning performance based on debris levels and floor surface.
Maintain a steady pace for best results.
Powering On and Off
To begin vacuuming, firmly press the power button located on the vacuum body. A clear indicator light will illuminate, confirming operation. To cease cleaning, press the power button again. The indicator light will extinguish, signifying the vacuum is off.
Ensure the vacuum is unplugged during extended periods of non-use.
Adjusting Suction Control
Optimize cleaning for various surfaces using the suction control dial. For delicate drapes or upholstery, reduce suction to prevent damage. Increase suction for powerful carpet cleaning and stubborn debris removal. Observe the floor type and adjust accordingly for best results.
Experiment to find the ideal setting!
Operating Instructions: Lift-Away Mode
Unlock versatility by detaching the canister from the base for portable cleaning. This mode excels at reaching above-floor areas like stairs, furniture, and tight spaces. Attach desired accessories to the wand or directly to the canister. Ensure secure connections before powering on for optimal suction and maneuverability.
Enjoy effortless cleaning!
Detaching the Canister
To release the canister, locate the release button typically found on the handle or near the base of the vacuum. Press the button while gently lifting the canister away from the floor nozzle. A click indicates successful detachment. Ensure the power is off before attempting removal. The wand and hose can now be utilized independently with the canister.
Cleaning Above-Floor Areas
With the canister detached, utilize the wand and appropriate accessories to clean ceilings, curtains, upholstery, and tight spaces. Attach the desired tool – a crevice tool for edges, or a dusting brush for surfaces. Adjust the wand length for comfortable reach. Employ lower suction settings for delicate fabrics to prevent damage, ensuring effective dust removal.
Brushroll Settings and Usage
Your Shark Navigator features adjustable brushroll settings for versatile floor cleaning. Select “Hard Floor” to polish and clean bare floors gently. Engage “Carpet” for deep cleaning and agitation on carpets and rugs. For transitioning between surfaces, utilize the “Off” setting to disable brushroll rotation, preventing scattering and damage. Regularly inspect for hair wrap!
Selecting the Appropriate Brushroll for Different Floors
Maximize cleaning by choosing the correct brushroll setting. For delicate hard floors like wood or tile, use the “Hard Floor” setting to avoid scratching. On carpets and rugs, the “Carpet” setting provides powerful agitation for deep dirt removal. Switching off the brushroll prevents scattering debris on hard surfaces during transitions.
Dealing with Hair Wrap on the Brushroll
Prevent performance loss by regularly removing hair from the brushroll. First, power off and unplug the vacuum. Utilize the included tool, or scissors carefully, to cut and remove wrapped hair fibers. Consistent cleaning maintains suction and extends brushroll life. Avoid pulling forcefully, which could damage bristles.

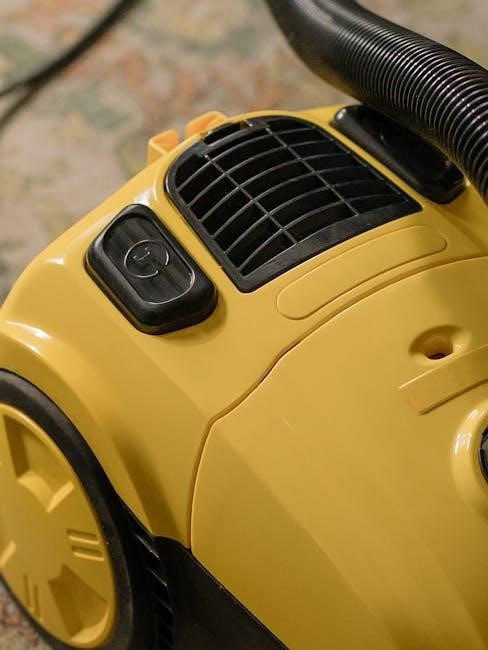
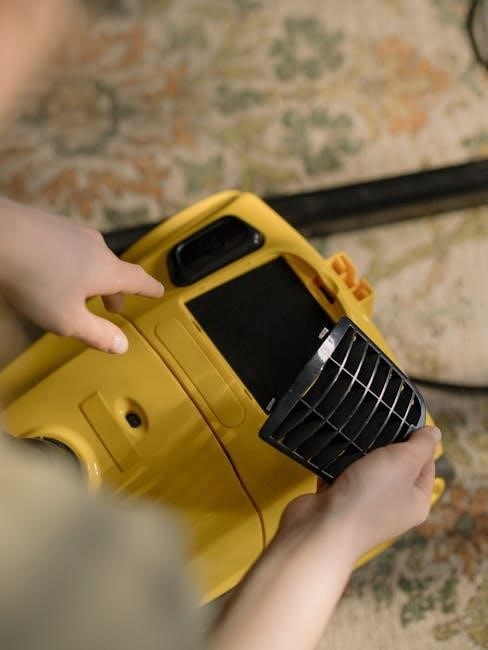
Filter Maintenance
Maintaining clean filters is crucial for optimal suction and air quality. Regularly locate and remove both the foam and HEPA filters. Wash the foam filter with water, allowing it to dry completely before reuse. Replace the HEPA filter every six months, or as needed, depending on usage.
Locating and Removing Filters
To access the filters, first, disconnect the vacuum from power. The dust cup must be emptied. Locate the filter access door, typically on the rear of the canister. Open the door and gently remove the foam and HEPA filters. Note their positions for correct re-installation later.
Cleaning and Replacing Filters
For optimal suction, regularly clean the filters. Hand wash the foam filter in warm water, squeezing gently; allow it to dry completely before reuse. The HEPA filter should be tapped gently to remove dust – do not wash. Replace filters every six months, or as needed,
Emptying the Dust Cup
To empty, detach the dust cup by pressing the release button. Hold over a trash receptacle and press the bottom release latch to empty contents. Ensure the dust cup is securely reattached before resuming vacuuming. Regularly check for blockages in the dust cup opening,

Step-by-Step Dust Cup Emptying Procedure
First, power off and unplug the vacuum. Press the dust cup release button. Holding the cup over a trash bin, locate and depress the bottom release latch. Empty all debris, then close the latch securely. Reattach the dust cup to the vacuum until it clicks into place.
Troubleshooting Dust Cup Issues
If the dust cup doesn’t empty completely, check for blockages at the inlet. Ensure the dust cup is properly sealed when reattached; a poor seal reduces suction. For stubborn debris, gently tap the cup while emptying. Regularly inspect the dust cup for cracks or damage, replacing if needed.
Troubleshooting Common Problems
Experiencing issues? A vacuum that won’t power on often indicates a tripped circuit or full dust cup. Loss of suction frequently stems from a clogged filter, hose, or wand. Inspect and clean these components thoroughly. Check for blockages within the brushroll and floor nozzle. Regular maintenance prevents most common operational difficulties.
Vacuum Not Turning On
If your Shark Navigator fails to power on, first verify the unit is securely plugged into a working electrical outlet. Check your home’s circuit breaker or fuse box for tripped breakers or blown fuses. Ensure the dust cup isn’t full, as this can trigger an automatic shut-off. A clogged filter may also prevent operation.

Loss of Suction
Reduced suction often indicates a blockage within the system. Begin by checking the hose, wand, and floor nozzle for obstructions. Inspect and clean the filters – a dirty filter significantly restricts airflow. Ensure the dust cup isn’t overfilled. Verify the brushroll is free from tangled hair or debris, as this can impede suction power.
Deep Cleaning and Maintenance
To maintain peak performance, periodically wash removable parts like the dust cup, filters, and wand with mild detergent and water; ensure they are completely dry before reassembly. Regularly inspect the vacuum for blockages in the hose, wand, and floor nozzle. A thorough cleaning schedule extends the lifespan and efficiency of your Shark Navigator.
Washing Removable Parts
Carefully remove the dust cup, filters, and wand. Wash these components with lukewarm water and a mild dish soap. Avoid harsh chemicals or abrasive cleaners. Rinse thoroughly to remove all soap residue. Crucially, allow all parts to air dry completely – at least 24 hours – before reassembling to prevent mold or mildew growth.
Checking for Blockages
Regularly inspect the wand, hose, and brushroll for obstructions like hair, debris, or large particles. Detach these components and visually examine them. Use a long, flexible object – a broom handle, perhaps – to carefully dislodge any blockages. Ensure the vacuum is off during this process to prevent accidental activation and potential injury.
Understanding Shark’s Technology
Shark’s innovative Lift-Away technology allows for portable cleaning, detaching the canister for above-floor versatility. Furthermore, the Anti-Allergen Complete Seal Technology traps 99.9% of dust and allergens inside the vacuum, preventing them from re-circulating into your air; These features combine to deliver a powerful and hygienic cleaning experience.
Lift-Away Technology Explained
The Lift-Away feature provides unparalleled cleaning flexibility. By simply detaching the canister from the base, you transform your full-sized upright vacuum into a lightweight, portable cleaning solution. This allows effortless cleaning of stairs, upholstery, and hard-to-reach areas, offering convenience without sacrificing suction power. It’s truly versatile!
Anti-Allergen Complete Seal Technology
Shark’s Anti-Allergen Complete Seal Technology traps 99.9% of dust, allergens, and pet dander inside the vacuum. This system features a sealed architecture, including a HEPA filter, ensuring cleaner air exhaust and preventing recirculation of microscopic particles back into your home. Breathe easier with a truly deep clean!
Safety Precautions
Always disconnect the vacuum before performing maintenance or troubleshooting. Do not use outdoors or on wet surfaces. Avoid vacuuming flammable liquids or materials. Keep the hose and wand away from heated surfaces. Never operate with a damaged cord or plug. Exercise caution when vacuuming stairs.
Important Safety Guidelines
Read all instructions before use to prevent injury or damage. Ensure proper grounding to reduce shock risk. Never leave the vacuum unattended while plugged in. Do not allow children to operate the appliance. Inspect the cord regularly for damage. Use only manufacturer-approved accessories.
Avoiding Damage to Floors and Furniture
Test the vacuum on an inconspicuous area before full cleaning, especially on delicate floors. Avoid vacuuming sharp objects or flammable materials. Lift the vacuum head when maneuvering over area rugs or cords. Do not force the vacuum over rough surfaces. Use appropriate brushroll settings for different floor types to prevent scratching.
Frequently Asked Questions (FAQ)

Q: Why has suction decreased? A: Check for blockages in the hose, wand, or filters. Q: Can I wash the filters? A: Some filters are washable; refer to the filter maintenance section. Q: What if the brushroll stops spinning? A: Clear any hair or debris wrapped around the brushroll.
Common User Queries and Answers
Q: My vacuum won’t turn on – what should I do? A: Ensure the unit is plugged in and the power switch is engaged. Q: How often should I replace the filters? A: Replace filters every six months for optimal performance. Q: Can I use this on hardwood floors? A: Yes, select the appropriate brushroll setting.
Warranty Information
Shark’s commitment to quality includes a five-year limited warranty on the vacuum and its components. This covers defects in materials and workmanship under normal household use. The warranty does not cover damage from misuse or neglect. Proof of purchase is required for all warranty claims. Visit SharkClean;com for detailed warranty terms and claim submission.